Table of contents
Open Table of contents
Why I Dug Into Kubernetes Probes
Recently, I came across Sam Rose’s blog post on ngrok where he built Webernetes—a mini 100,000-line TypeScript port of Kubernetes running inside the browser to simulate pod lifecycles. Playing with interactive probe controls made me reflect on how often developers (myself included in the early days) treat Kubernetes health checks as copy-paste boilerplate without understanding what the Kubelet is actually doing under the hood.
In production microservices, probe misconfigurations are a silent killer. I’ve seen database latency spikes trigger cascading container restarts across an entire cluster, turning a 2-second DB slow-query spike into a 15-minute global outage.
Here are my key takeaways, mental models, and production rules of thumb for Startup, Readiness, and Liveness probes.
1. The Core Mental Model
The easiest way to understand Kubernetes health checks is to separate the who, the what, and the consequence:
- Who runs the checks? The Kubelet agent running locally on the worker node where your pod lives. Your API server or ingress doesn’t poll your pod; the local node daemon does.
- What does Kubelet do with the result? Depending on which probe fails, Kubelet either removes traffic (Readiness) or kills the container process (Startup & Liveness).
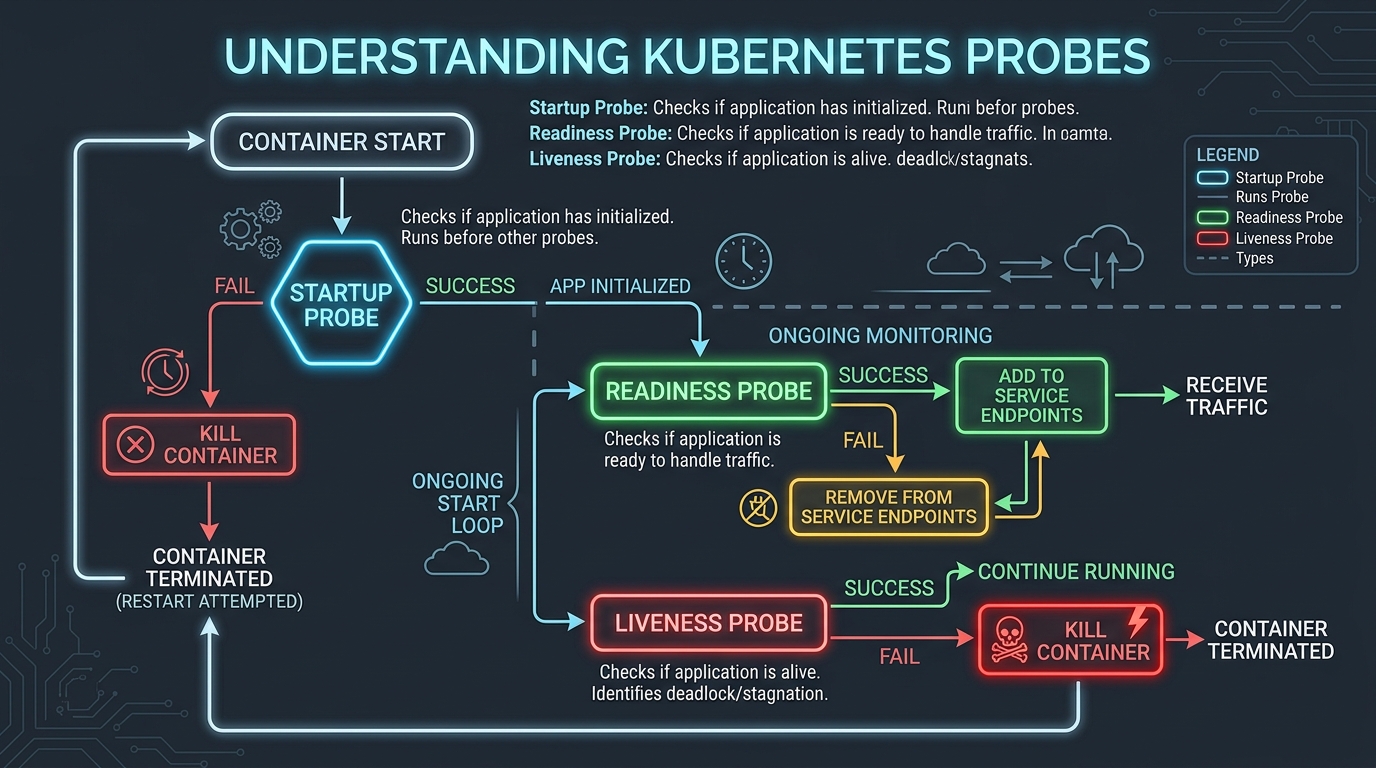
2. Startup vs. Readiness vs. Liveness
Here is how I reason about each of the three probe types:
Startup Probe: The Shield for Slow Boots
- Question it asks: “Has the container finished booting up yet?”
- What happens while it runs: All Readiness and Liveness probes are completely frozen.
- Why it matters: If you have a legacy Java/Spring Boot app that takes 60 seconds to run database migrations and warm up caches, a Liveness probe with a 15-second delay would kill the app mid-boot forever (a classic
CrashLoopBackOffloop). The Startup probe gives the app a generous grace period to boot without risking liveness restarts.
startupProbe:
  httpGet:
    path: /healthz/startup
    port: 8080
  periodSeconds: 10
  failureThreshold: 30 # Gives app up to 300s (30 * 10s) to finish booting
Readiness Probe: The Traffic Gatekeeper
- Question it asks: “Can this container accept user requests right now?”
- Failure action: Removes the Pod IP from the Kubernetes Service / EndpointSlice.
- Crucial detail: It NEVER restarts the container.
- Use case: If your application is temporarily overloaded, warming up a local cache, or executing a heavy batch computation, the Readiness probe fails, traffic gets diverted to sibling replicas, and your pod gets breathing room to catch up.
readinessProbe:
  httpGet:
    path: /healthz/ready
    port: 8080
  periodSeconds: 5
  failureThreshold: 3
Liveness Probe: The Self-Healing Restart Trigger
- Question it asks: “Is the container process deadlocked or completely broken?”
- Failure action: Kills the container process and replaces it.
- Use case: Catches unrecoverable states like thread deadlocks, memory corruption, or frozen event loops where the process is running but will never respond again.
livenessProbe:
  httpGet:
    path: /healthz/live
    port: 8080
  periodSeconds: 10
  failureThreshold: 3
3. The Lifecycle State Machine
Here is the exact decision loop Kubelet follows for every container:
4. Hard-Learned Production Lessons
Lesson 1: Never Check External Dependencies in Liveness Probes
This is the single most destructive mistake in Kubernetes infrastructure:
# BAD PRACTICE: Liveness probe checking Postgres / Redis / External APIs
livenessProbe:
  exec:
command: ["sh", "-c", "pg_isready -h postgres-db"]- What happens during a outage: If your PostgreSQL cluster experiences a temporary 5-second connection pool saturation, every single app instance’s Liveness probe will fail at the same time. Kubelet will kill all your application pods simultaneously.
- The result: A massive stampeding herd when all pods reboot at once and overwhelm PostgreSQL with hundreds of new connection handshakes.
- The rule: Liveness probes must ONLY check internal container health (e.g., local process/thread status). Use Readiness probes for dependency checks so traffic is temporarily paused without destroying pods.
Lesson 2: Mind Your Probe Timeouts vs. App Deadlines
If your application’s HTTP connection timeout is 5 seconds, but your probe’s timeoutSeconds is set to 1, Kubelet will mark the probe as failed before your app even finishes evaluating the health endpoint under mild load.
Always set: $$\text{timeoutSeconds} \ge \text{Health Endpoint Processing Latency} + \text{Safety Buffer}$$
5. A Battle-Tested Pod Blueprint
Here is a clean, production-ready Deployment template incorporating these learnings:
apiVersion: apps/v1
kind: Deployment
metadata:
  name: order-service
spec:
  replicas: 3
  selector:
    matchLabels:
      app: order-service
  template:
    metadata:
      labels:
        app: order-service
    spec:
      containers:
        - name: app
          image: myregistry/order-service:v1.2.0
          ports:
            - containerPort: 8080
          resources:
            requests:
              cpu: "250m"
              memory: "512Mi"
            limits:
              cpu: "500m"
              memory: "1Gi"

          # 1. Startup Probe: Gives slow DB migrations up to 120s to complete
          startupProbe:
            httpGet:
              path: /health/startup
              port: 8080
            periodSeconds: 5
            failureThreshold: 24

          # 2. Readiness Probe: Checks DB connection pool & readiness
          readinessProbe:
            httpGet:
              path: /health/ready
              port: 8080
            periodSeconds: 5
            timeoutSeconds: 2
            failureThreshold: 3

          # 3. Liveness Probe: Strictly local process/thread check
          livenessProbe:
            httpGet:
              path: /health/live
              port: 8080
            periodSeconds: 10
            timeoutSeconds: 3
            failureThreshold: 3
Summary
Understanding the distinct roles of Startup (boot shield), Readiness (traffic gatekeeper), and Liveness (process restarter) is what separates brittle Kubernetes deployments from truly self-healing microservices.
Keep your Liveness checks strictly local to the process, use Readiness checks to handle traffic shed during load spikes, and give slow-booting apps the time they need with Startup probes!